Desktop Application
Download, install, and manage the Xbattery BMS Desktop Application
Xbattery BMS Desktop Application
A comprehensive Windows desktop application designed for monitoring, configuring, and managing Xbattery BMS devices. The application provides real-time telemetry data visualization, parameter configuration, firmware updates, and advanced diagnostic capabilities.
System Requirements
Download Now
Get the latest version of the BMS Desktop Application
Download Xbattery.BMS-win-Setup.exe.zip.NET 8.0 Runtime included • Automatic updates enabled
Quick Install Steps
Application Preview
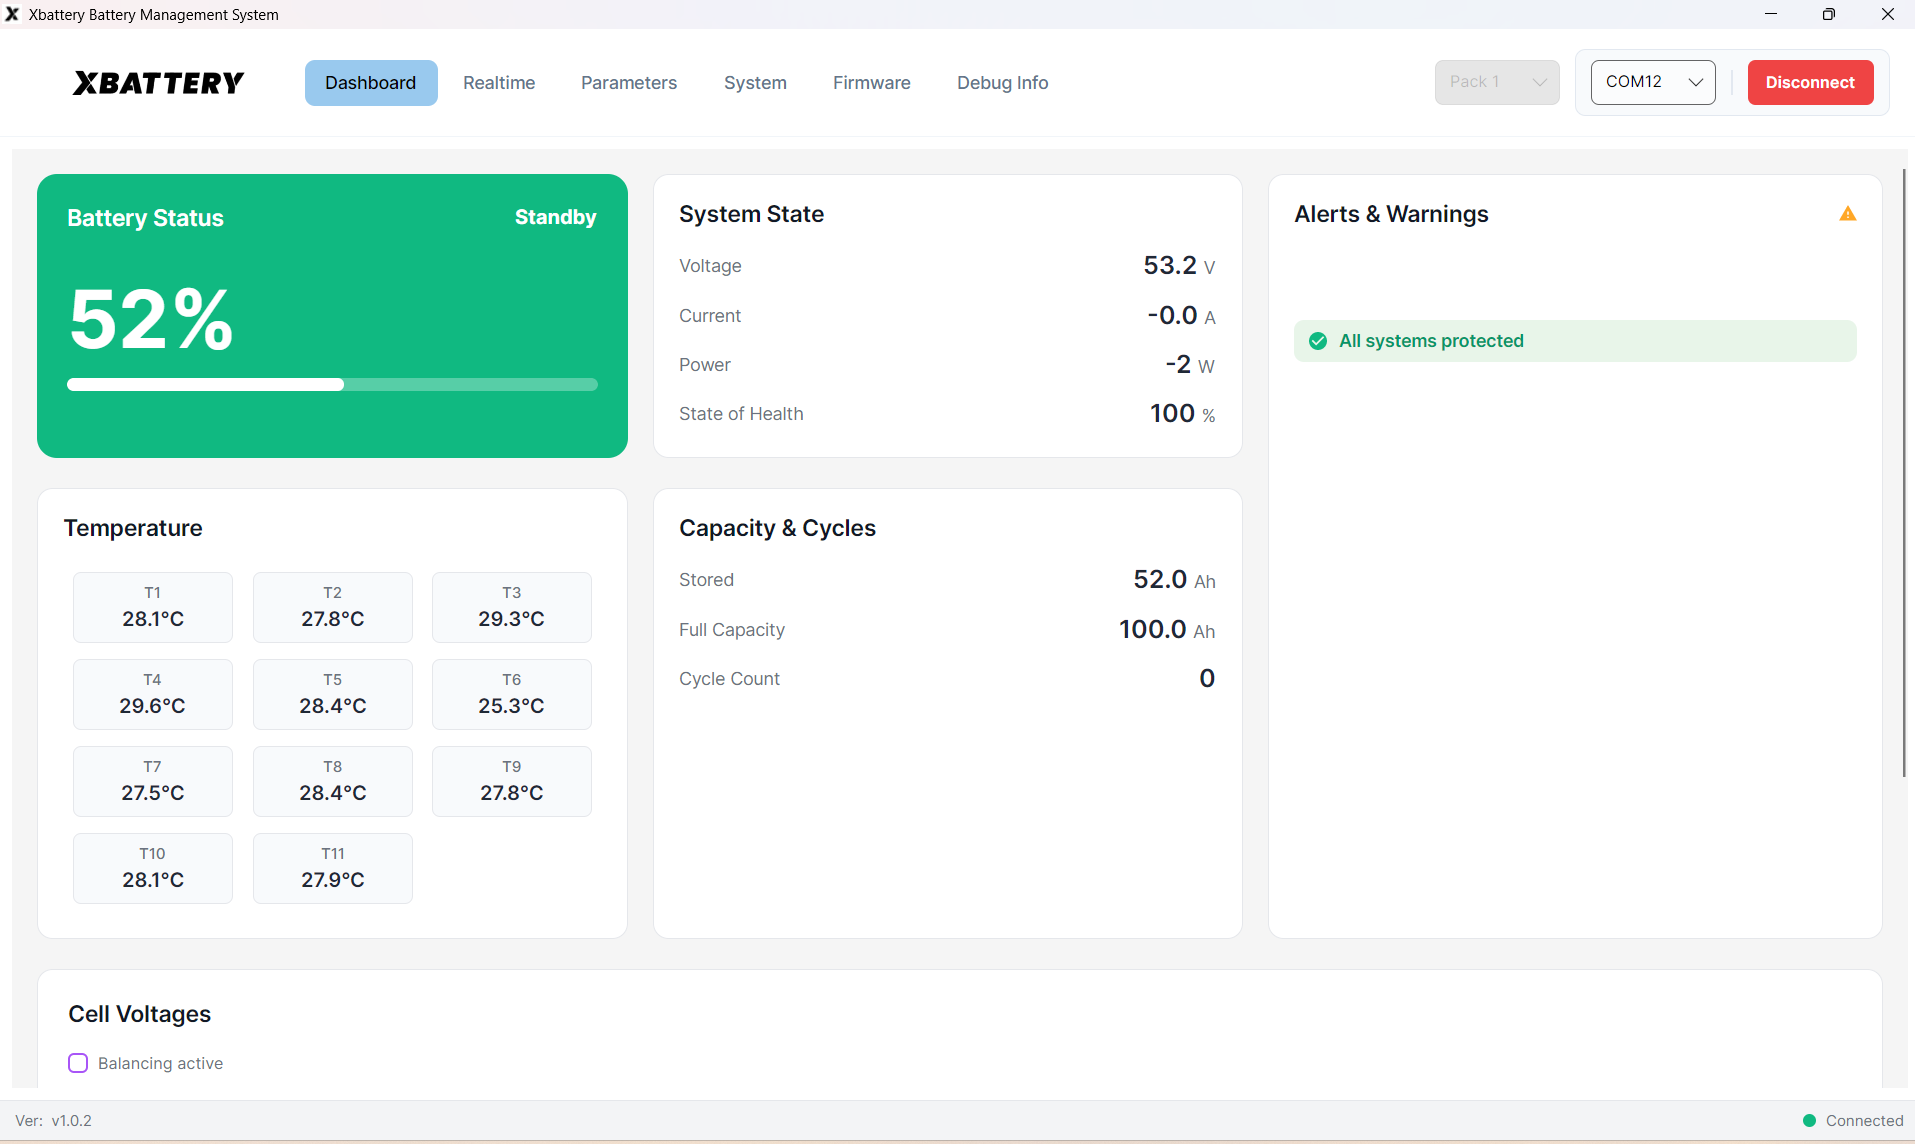
Real-time battery monitoring dashboard
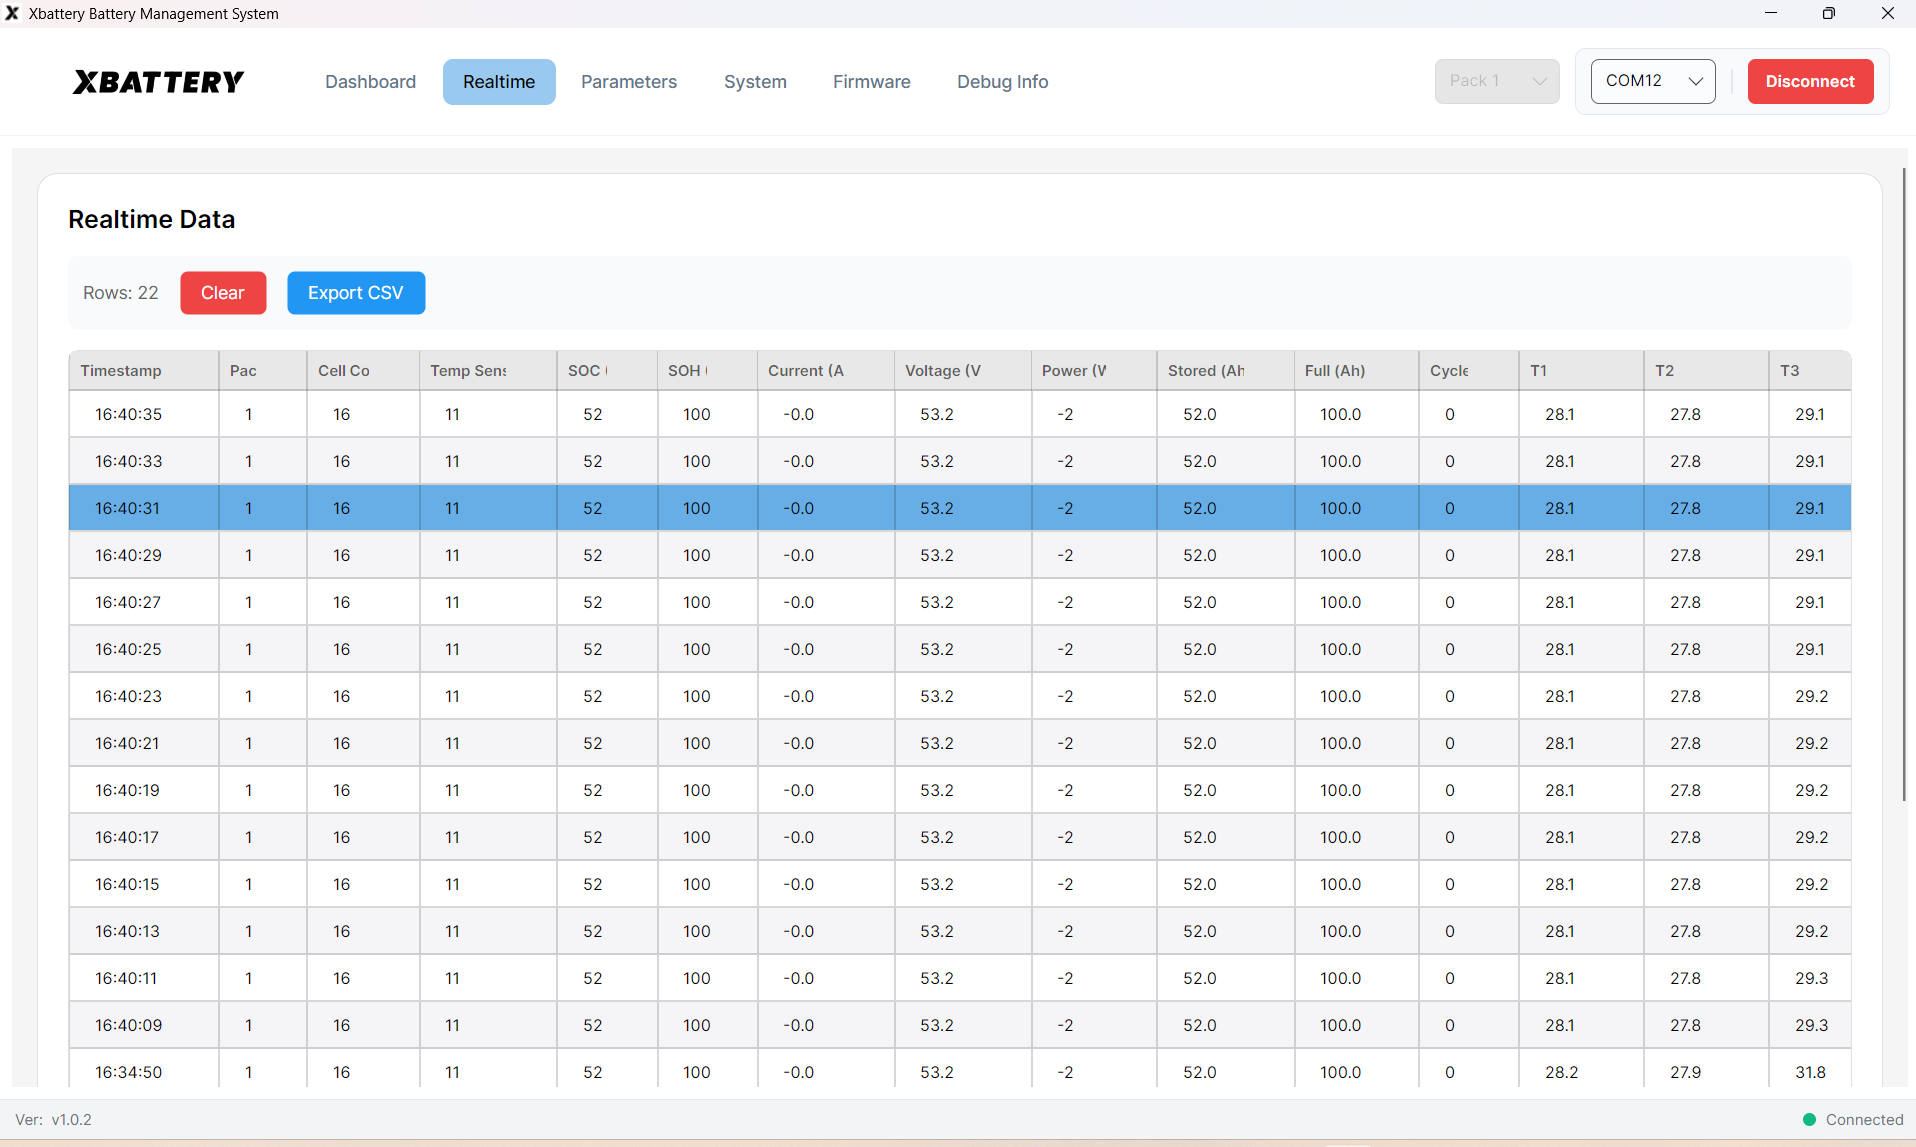
Detailed telemetry table with CSV export
User Guide & Documentation
Table of Contents
Overview
The Xbattery Battery Management System (BMS) Desktop Application is a comprehensive Windows desktop application designed for monitoring, configuring, and managing Xbattery BMS devices. The application provides real-time telemetry data visualization, configuration, firmware updates, and advanced diagnostic capabilities through an intuitive graphical user interface.
Key Capabilities
- Real-time Monitoring: Live dashboard displaying battery state of charge (SOC), state of health (SOH), voltage, current, temperature, and cell-level data
- Firmware Management: Over-the-air (OTA) firmware updates with progress tracking
- Data Logging: Export telemetry data to CSV format for analysis
- Multi-Pack Support: Monitor and configure up to 16 individual battery packs
- Auto-Updates: Automatic application updates via custom update servers
Prerequisites
System Requirements
- Operating System: Windows 10 (version 1809 or later) or Windows 11
- Architecture: x64 (64-bit)
- RAM: Minimum 4 GB (8 GB recommended)
- Storage: 100 MB free disk space
Hardware Requirements
- BMS Device: Xbattery BMS compatible device
- Communication Interface: USB-to-Serial adapter (FTDI, CH340, CP2102, or compatible) or CAN bus adapter (optional)
- Cables: Appropriate USB and communication cables for your BMS device
Software Dependencies
- .NET Runtime: .NET 8.0 Runtime (automatically installed with the application if not present)
- USB Drivers: Appropriate USB-to-Serial drivers for your adapter (typically installed automatically by Windows)
Installation
Standard Installation
- Download and Extract the Installer
- Download
Xbattery.BMS-win-Setup.exe.zipfrom above - Extract the ZIP file to access
Xbattery.BMS-win-Setup.exe
- Download
- Run the Installer
- Right-click the installer and select "Run as Administrator" (recommended)
- Follow the installation wizard
- Choose installation directory (default:
C:\Program Files\BMS Desktop) - Click "Install"
- Complete Installation
- Wait for the installation to complete
- Click "Finish" to launch the application
- The application will be available in the Start Menu as "Xbattery BMS Desktop"
Post-Installation
- Launch the application from Start Menu
- Check that the application window opens correctly
- Verify version number in the status bar (bottom-left)
- Connect your USB-to-Serial adapter (Windows should auto-detect)
- Connect your BMS device via USB
- Note the COM port number in Device Manager
Quick Start Guide
First-Time Setup
- Launch the Application
Open "Xbattery BMS Desktop" from the Start Menu. The main window will display with navigation tabs at the top.
- Connect to Your BMS Device
- Ensure your BMS device is powered on and connected via USB
- In the top-right corner, locate the "Select Port" dropdown
- Select the COM port corresponding to your device (e.g., COM3)
- Click the "Connect" button
- Wait for the connection status indicator to turn green
- Select Battery Pack
Use the "Select Pack" dropdown to choose which pack to monitor (Pack 1 through Pack 16). Default: Pack 1.
- View Dashboard
The Dashboard tab is selected by default. You should see real-time data updating: SOC percentage, voltage and current readings, cell voltages and temperatures, and system status indicators.
Basic Operations
- Viewing Real-Time Data: Navigate to Dashboard tab, data updates automatically every few seconds
- Exporting Data: Go to Realtime tab, click "Start Logging", select interval, click "Save CSV" when done
- Updating Firmware: Go to Firmware tab, select firmware file (.bin), click "Flash Firmware", monitor progress
User Interface Overview
The application features a clean, modern interface with the following components:
Top Navigation Bar
- Left: Application logo
- Center: Navigation tabs (Dashboard, Realtime, Parameters, etc.)
- Right: Pack selector dropdown, COM port selector, Connect/Disconnect button, Status indicators
Content Area
- Displays the selected tab's content
- Scrollable for content that exceeds window height
- Responsive layout adapts to window size
Status Bar (Bottom)
- Left: Application version (clickable to unlock Debug Info tab)
- Center: Status messages or serial number
- Right: Connection status indicator (green = connected, red = disconnected)
Navigation Tabs
Active Tabs:
- Dashboard
- Realtime
- System
- Firmware
Features & Tabs
Dashboard
Comprehensive overview of your battery system's current status.
Key Metrics:
- State of Charge (SOC), State of Health (SOH)
- Voltage, Current, Power
- Stored Capacity, Full Capacity, Cycle Count
- Max/Min Cell Voltages with cell numbers
- Cell Temperatures
- System Status, Mode, Protection Status, BMS State
Features: Real-time updates, color-coded status indicators, charging/discharging status
Realtime
Detailed telemetry data in tabular format with data logging capabilities.
Features:
- Telemetry table with all available BMS parameters
- CSV export for logged data
- Compatible with Excel, MATLAB, Python, etc.
System
Device information and real-time clock (RTC) management.
Features:
- Current RTC Time with auto-refresh
- Sync RTC button to synchronize with computer time
- Manufacturer Information (Name, Hardware/Firmware Versions)
- Battery Type, Pack Name, Serial Number
Firmware
Firmware update capabilities with progress tracking and safety features.
Features:
- Current firmware version display
- File selection for firmware (.bin format)
- Real-time progress tracking
- Validation and compatibility checks
Critical: Do not disconnect device during firmware update. Ensure stable power supply. This can brick the device if interrupted.
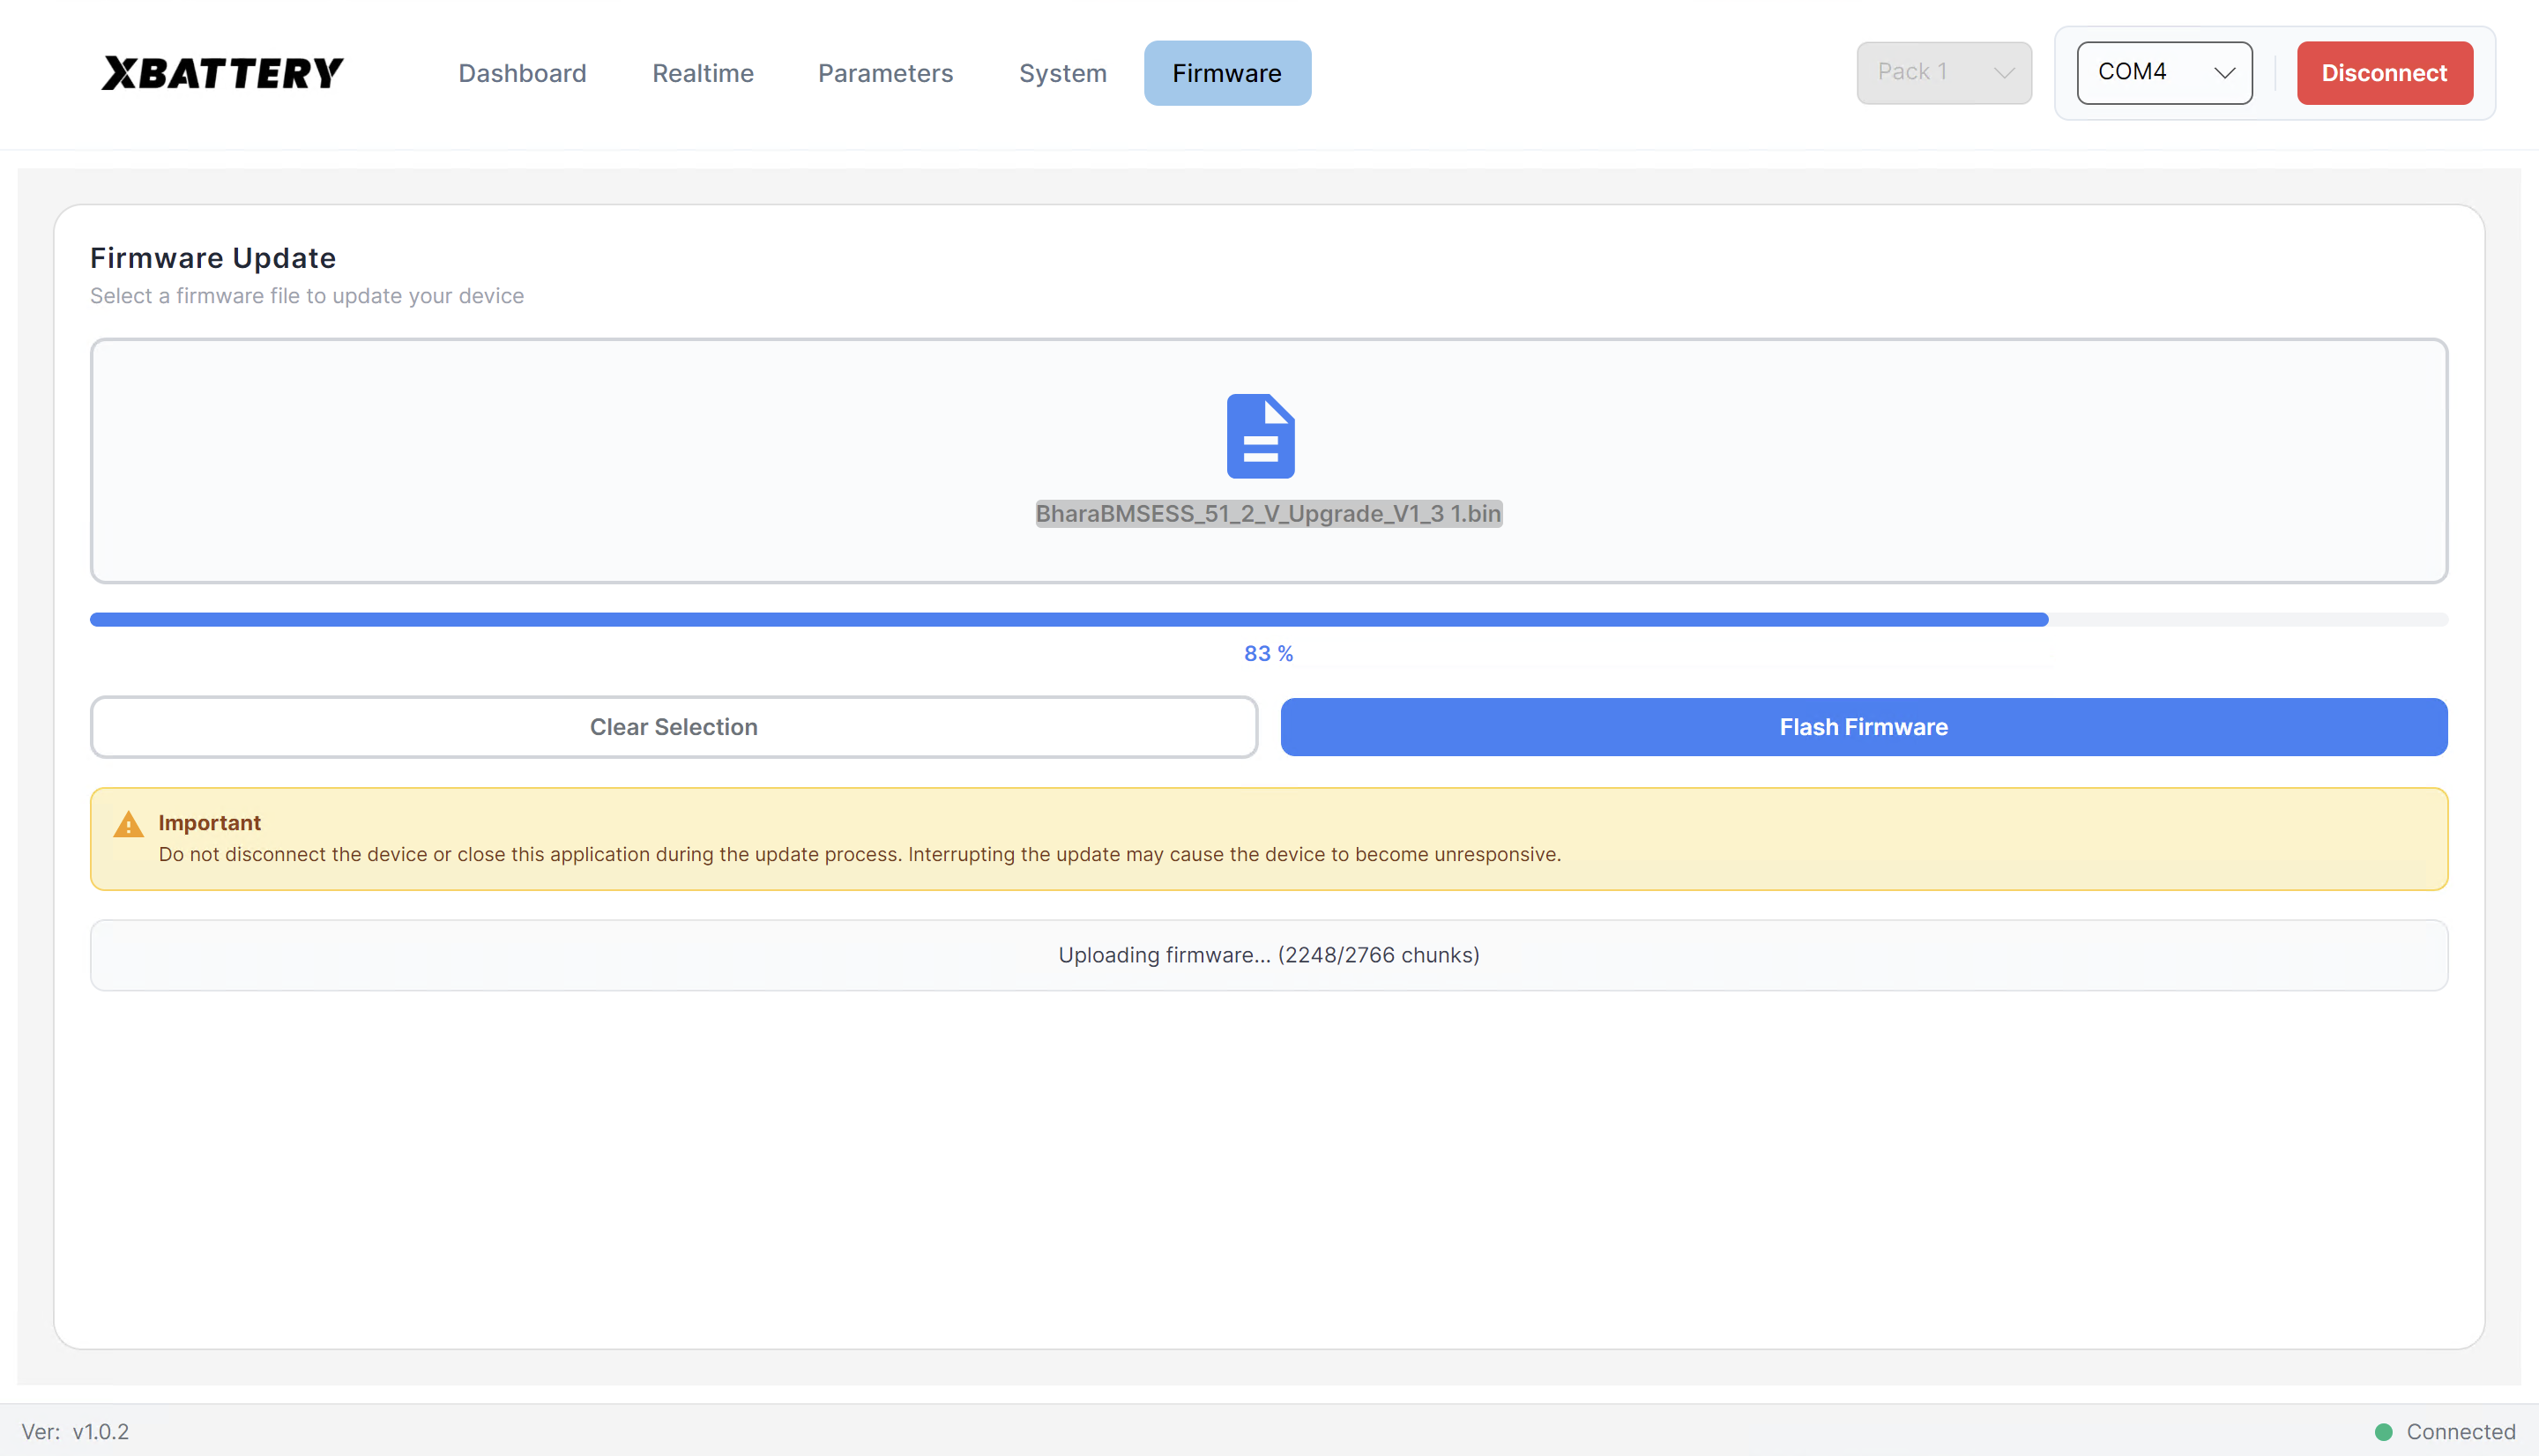
Firmware update interface
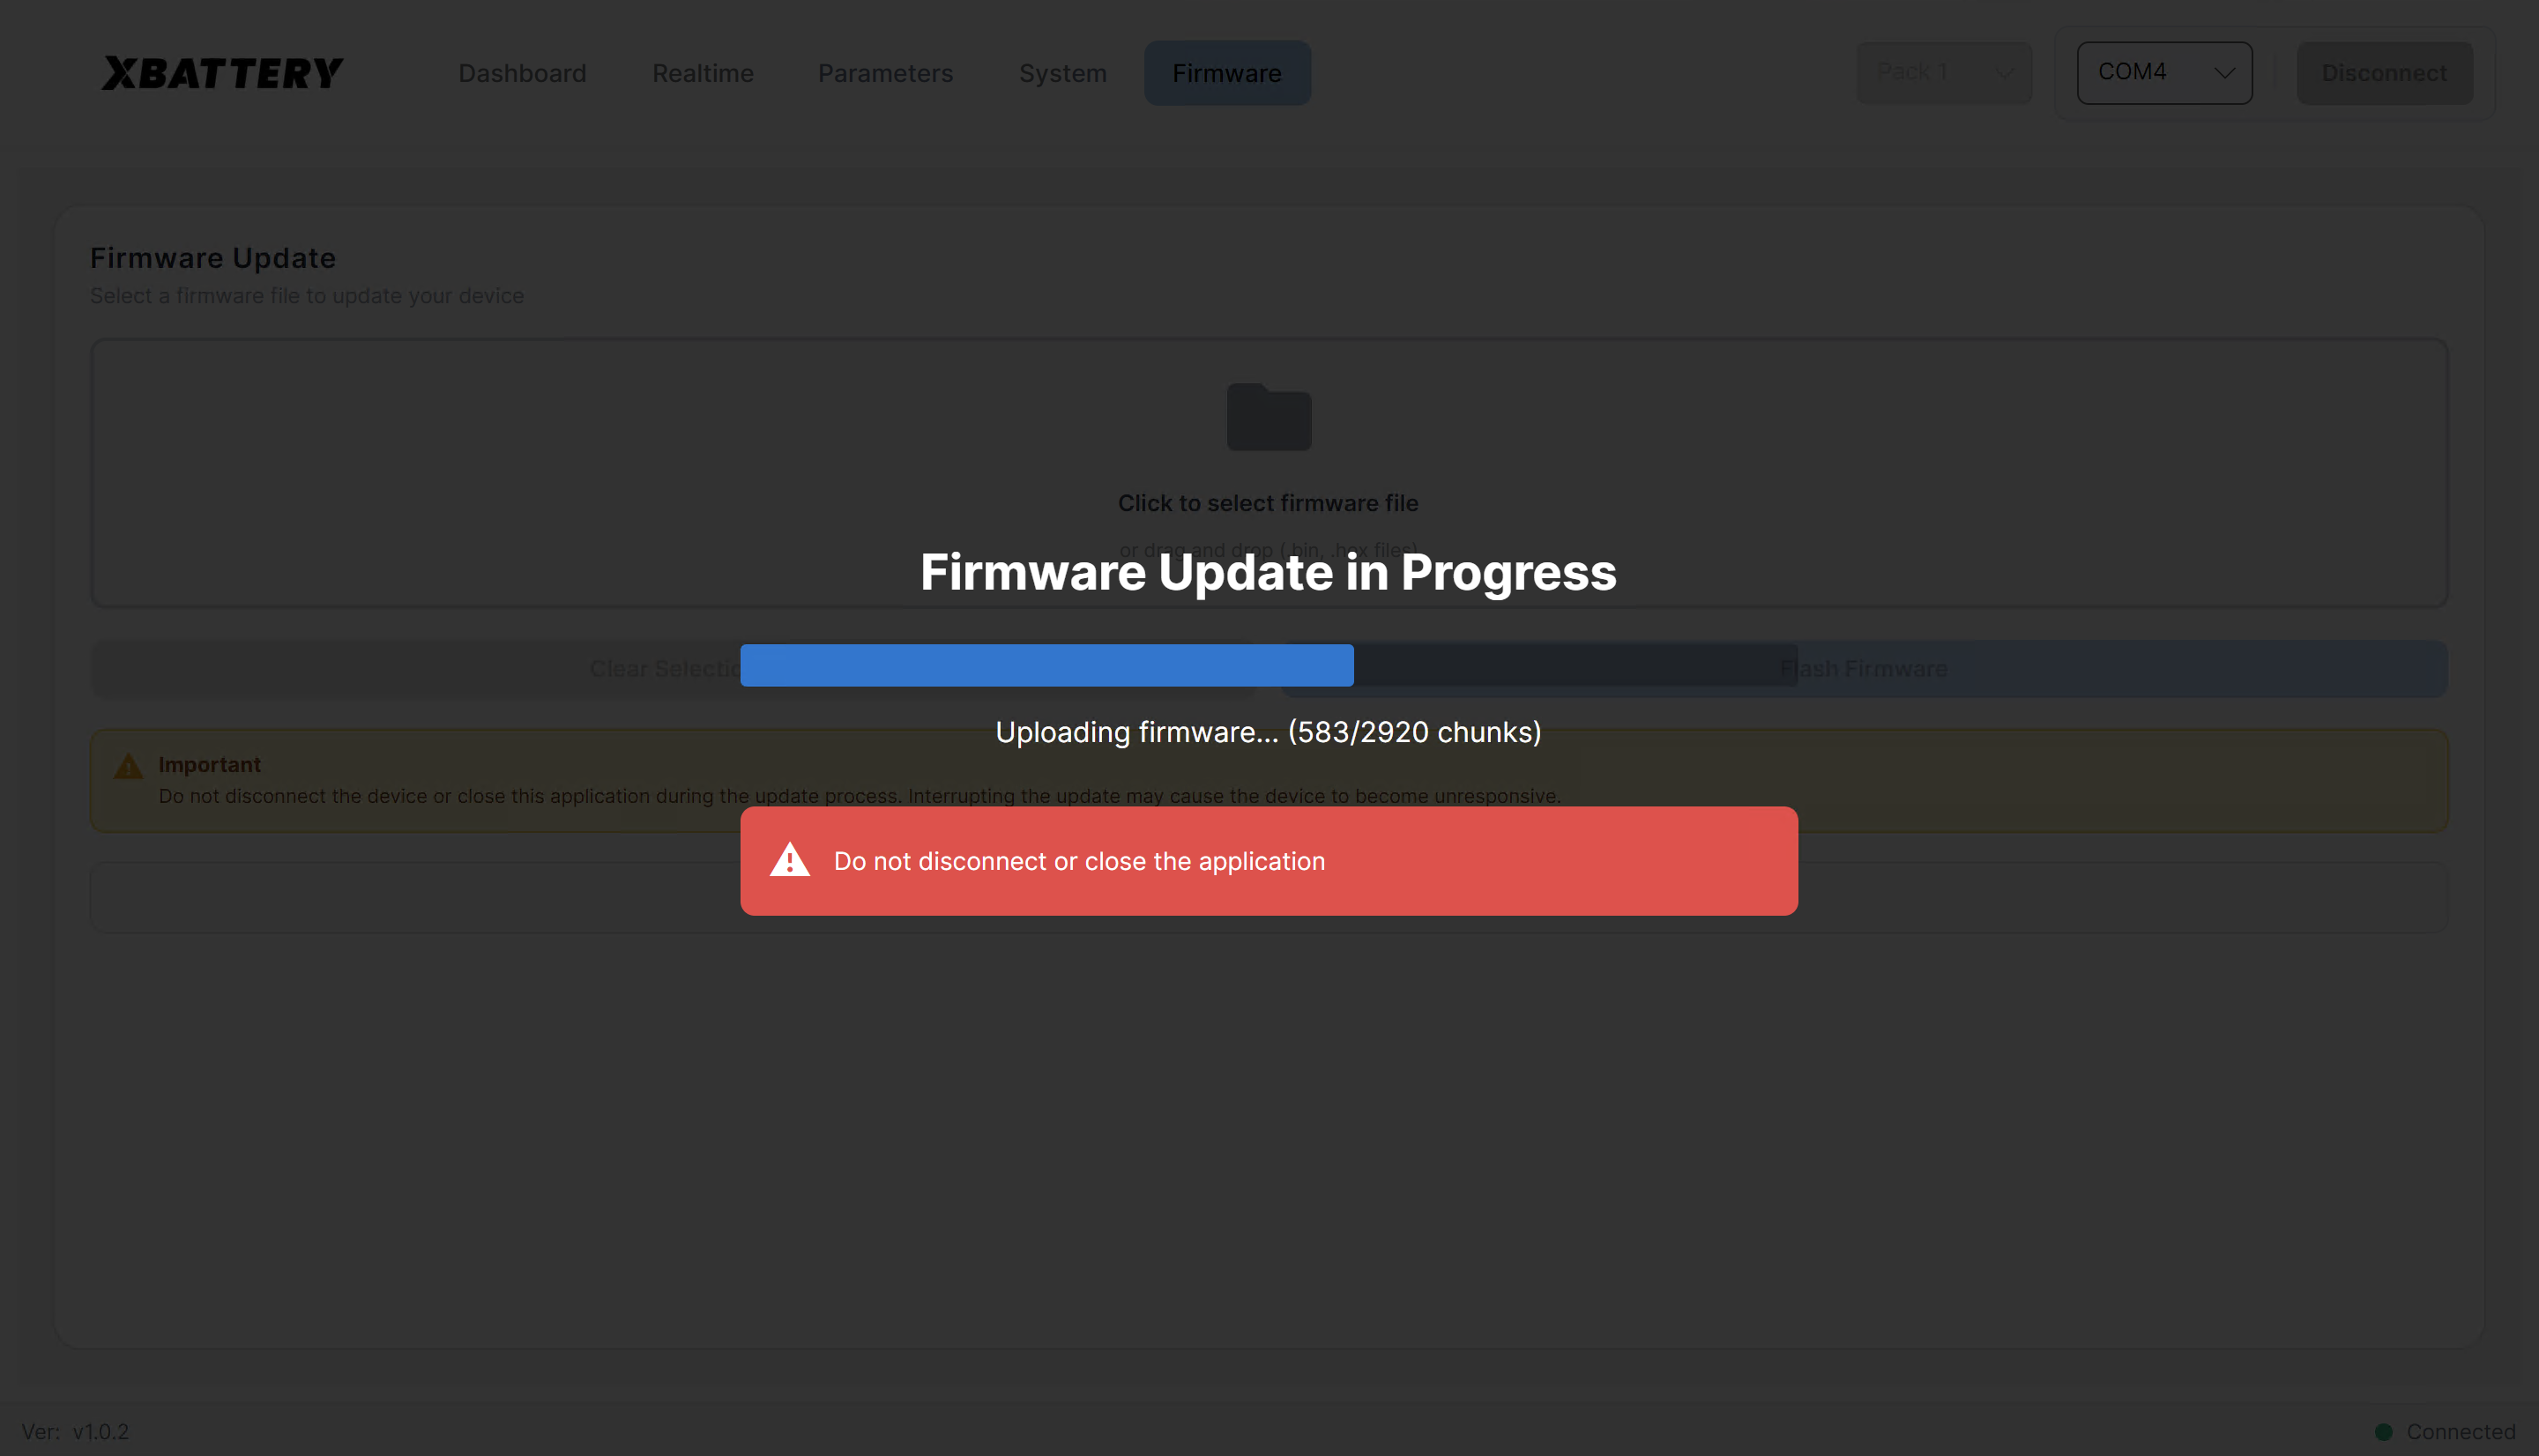
Firmware update progress tracking
Connection Management
Establishing Connection
- Ensure BMS device is powered on
- Connect USB cable to computer
- Identify COM port in Device Manager (e.g., COM3)
- Select COM port from dropdown in application
- Click "Connect" button
- Wait for green status indicator
- Verify data appears in Dashboard
Serial Port Configuration
- Baud Rate: 115200
- Data Bits: 8
- Parity: None
- Stop Bits: 1
- Flow Control: None
Connection Troubleshooting
Port Not Appearing:
- Install USB-to-Serial drivers
- Check device power and USB cable
- Close other applications using the port
- Restart computer if needed
Connection Fails:
- Verify correct COM port
- Check device is in communication mode
- Power cycle device
- Try different USB port
Troubleshooting
Common Issues
Application Won't Start
Symptoms: Application crashes on launch, error messages, or nothing happens.
Solutions:
- Check Windows Event Viewer for error details
- Verify .NET 8.0 Runtime is installed
- Check log files in application directory
- Try running as Administrator
- Reinstall application
No COM Ports Available
Symptoms: Port dropdown is empty, device not detected.
Solutions:
- Install USB-to-Serial drivers
- Check Device Manager for device
- Try different USB cable or port
- Restart computer
Data Not Updating
Symptoms: Dashboard shows stale data, values don't change.
Solutions:
- Check connection status indicator
- Try disconnecting and reconnecting
- Verify device is operational
- Restart application
Firmware Update Fails
Symptoms: Update doesn't start, stalls mid-way, or error messages.
Solutions:
- Verify firmware file is .bin format
- Check compatibility with device model
- Ensure stable power supply
- Don't disconnect during update
- Contact support if issue persists
Getting Help
When reporting issues, include:
- Application version
- Operating system version
- Device model and firmware version
- Exact error messages
- Steps to reproduce the issue
Support & Resources
Version Information
Current version: 1.0.6
The application checks automatically for updates on startup.
